Understand Google reCAPTCHA with Diagrams and Code Examples
Code examples are written in React, TypeScript, and Node.js
Even in 2022, over a decade since reCAPTCH been invented, I find it is still not super straightforward to understand how Google reCAPTCHA works and integrates with a web app if this is the first time looking at it, thanks to the minimum official documents.
After a lot of reading, digging, and trial & error, I think I finally understood it, but I also belive there should be an much easier way for newcomers to pick it up, which would pack with clear diagrams and simple code examples.
That’s why I wrote this article — to make a step stone for those who want to understand Google reCAPTCHA easier and faster.
Basics
To discuss Google reCAPTCHA, we need to start with a more basic concept — CAPTCHA.
CAPTCHA stands for “Completely Automated Public Turing test to tell Computers and Humans Apart” [1], which is a commonly used method to prevent bots from performing actions such as account registration.
For example, you probably already seen something like below when register or login on many web sites, which is asking you to enter the characters recognised from the image.
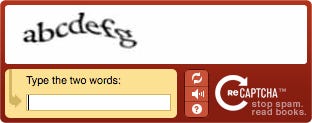
However, forcing users to read and enter the characters is a friction and interruption, and smart bots may able to easily identify those distorted letters then pass the test.
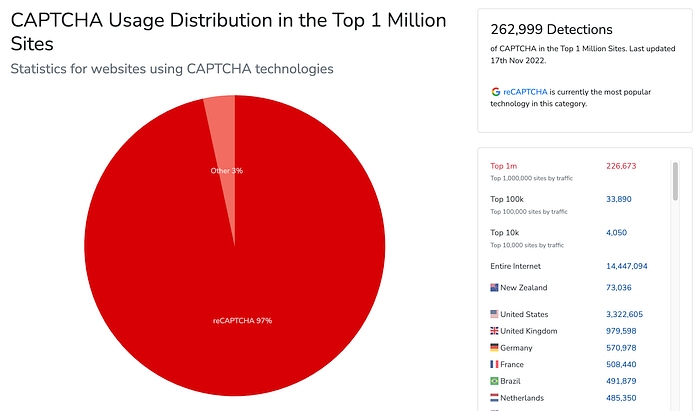
Thus, more advanced test methods are introduced to fight against bots, and Google reCAPTCHA is the most popular solution.
Understand different versions of Google reCAPTCHA
When stepping into the world of Google reCAPTCHA, you will face an immediate challenge of which one to choose from the tree available options [2]:
- reCAPTCHA v2 (“I’m not a robot” Checkbox)
- reCAPTCHA v2 (Invisible reCAPTCHA badge)
- reCAPTCHA v3
Unfortunately, the official documents only have brief introduction, leaving the joy of deep diving to us who want to know more.
reCAPTCHA v2 (“I’m not a robot” Checkbox)
First of all, let’s assume we have a register screen like this:

We would expect the flow to be:

The “image selection challenge” is a pop up like below:

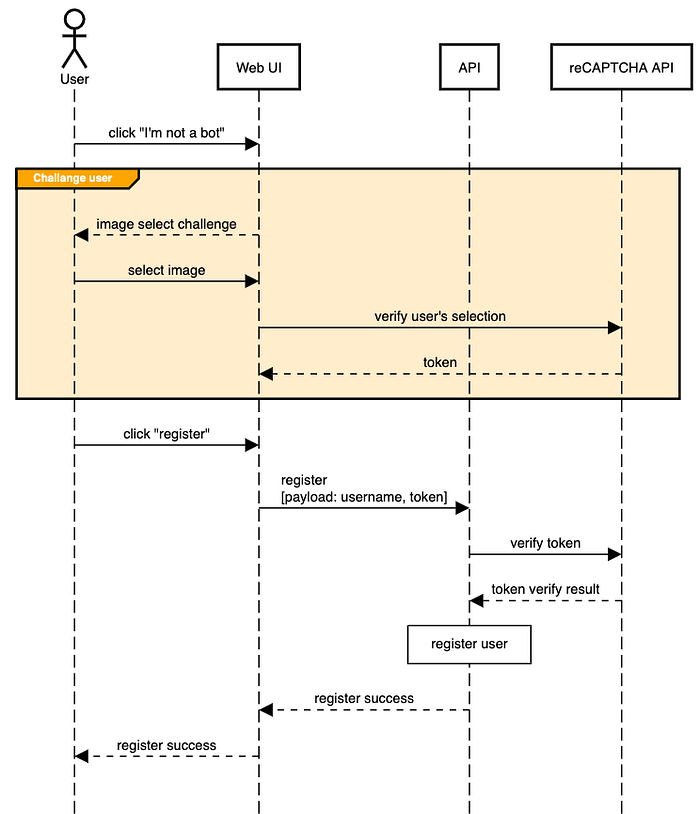
The key to understand “how” and “why” the flow works is a token behind the scene:
- When you click “I’m not a bot”, reCaptcha will check if you are likely to be a bot
- If reCAPTCHA think you’re not likely to be a bot, then it will give you a token
- If reCAPTCHA think you might be a bot, then it will pop up an image selection quiz, and you can only get the token after you successfully answered the quiz
- When web UI sends the final “register” request to API server, it will not only carry the “username” in the payload, but also include the “token” issued by reCAPTCHA
- When API server receives the request, it will verify the token via talking to reCAPTCHA server, and will prevent user from registration when the token is not valid
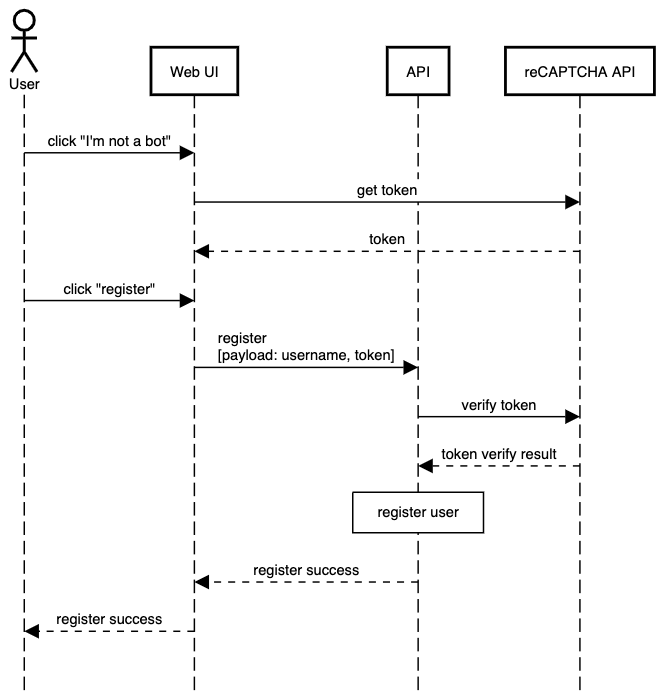
So we can represent the flow by the following sequence diagrams:
When there is no image challenge (diagram source):
When there is an image challenge (diagram source):
Example code: frontend
Let’s look at the example React component for implemenation details.
First of all, the component will render a form with username input, reCAPTCHA checkbox, register button, and error message.
<form className="Form" data-testid="FormWithCheckbox" data-registration-result={registrationResult}>
  <div>
    <label>
      <span>username: </span>
      <input type="text" name="username" value={username} onChange={handleUsernameChange} />
    </label>
  </div>

  <ReCAPTCHA sitekey={SITE_KEY} onChange={handleRecaptchaChange} />

  <button type="button" onClick={handleClickRegister}>
    register
  </button>

  {errorMessage && <div className="Error">{errorMessage}</div>}
</form>
It worth mentioning here that we are using a library — react-google-recaptcha for convinent reCAPTCHA setup and rendering.
Then we store form states for username and token, and update them with callbacks (used in JSX).
const [username, setUsername] = React.useState("");
const [recaptchaToken, setRecaptchaToken] = React.useState<string | null>(null);

const handleRecaptchaChange = React.useCallback((value: string | null) => {
  console.log("FormWithCheckbox::handleRecaptchaChange > value: ", value);
  setRecaptchaToken(value);
}, []);

const handleUsernameChange = React.useCallback((event: React.ChangeEvent<HTMLInputElement>) => {
  const value = trim(event.target.value);
  setUsername(value);
}, []);
Finally, when user clicking “register”, we send the API request with username and token.
const [registrationResult, setRegistrationResult] = React.useState("");
const [errorMessage, setErrorMessage] = React.useState("");

const handleClickRegister = React.useCallback(async () => {
  setErrorMessage("");

  if (!recaptchaToken) {
    alert("Please click reCAPTCHA checkbox!");
    return;
  }

  try {
    const response = await axios.post("/api/user/registration", {
      username,
      recaptchaToken,
      recaptchaVersion: "V2_CHECKBOX",
    });
    const { result } = response.data;
    console.log("FormWithCheckbox::handleClickRegister > result: ", result);
    setRegistrationResult(trim(result));
    alert("Register success");
  } catch (e: any) {
    const response = e.response;
    const { result, error } = response.data;
    setRegistrationResult(trim(result));
    setErrorMessage(trim(error));
  }
}, [recaptchaToken, username]);
Example code: backend
The node.js code to handle the API request is very straightfoward:
- Validate user input
- Verify reCAPTCHA token
- Perform the main action (e.g., register)
- Return result
app.post("/api/user/registration", async (req, res) => {
  const recaptchaVersion = _.trim(_.get(req.body, "recaptchaVersion"));
  const username = _.trim(_.get(req.body, "username"));
  const token = _.trim(_.get(req.body, "recaptchaToken"));

  try {
    validateUsername(username);
    const secret = getSecretByRecaptchaVersion(recaptchaVersion);
    await verifyRecaptchaToken({ token, secret });
    // ... Register ...
    res.status(201).json({ result: "SUCCESS", username });
  } catch (e) {
    console.error(e);
    res.status(400).json({
      result: "FAIL",
      error: _.get(e, "message") ? _.get(e, "message") : JSON.stringify(e),
    });
  }
});
…and here is the code to verify reCAPTCHA token:
type VerifyRecaptchaTokenArgs = {
  secret: string;
  token: string;
};
const verifyRecaptchaToken = async (args: VerifyRecaptchaTokenArgs) => {
  const { secret, token } = args;
  if (!token || !secret) {
    throw new Error("reCAPTCHA secret or token is invalid");
  }

  const response = await axios.post(
    "https://www.google.com/recaptcha/api/siteverify",
    undefined,
    {
      params: { secret, response: token },
    }
  );

  console.log("reCAPTCHA siteverify result: ", response.data);

  if (!response.data.success) {
    throw new Error("reCAPTCHA token is invalid");
  }
};
The full code can be found on Github:
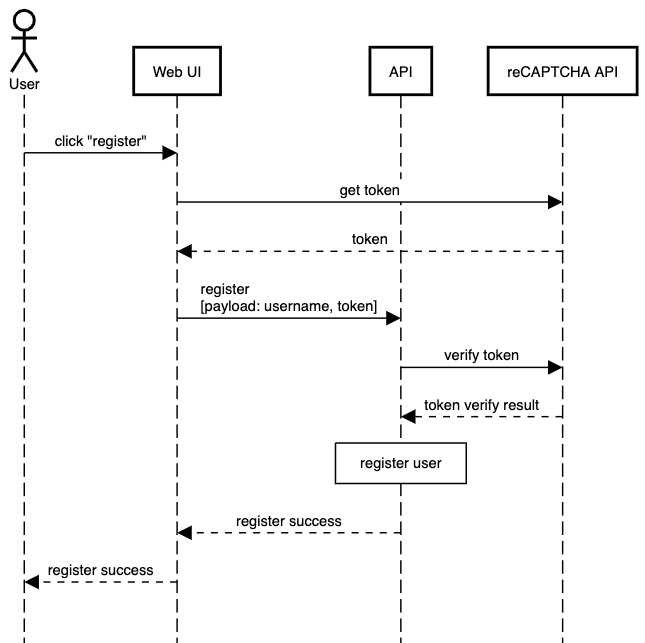
reCAPTCHA v2 (Invisible reCAPTCHA badge)
When using this option, the whole flow is identical to the checkbox version, except that user won’t need to tick “I’m not a bot” — it is implicitly ticked when user click the main action button (i.e., “register” button).
Thus, when there is no image challenge, the sequence diagram can be plot like below (diagram source):
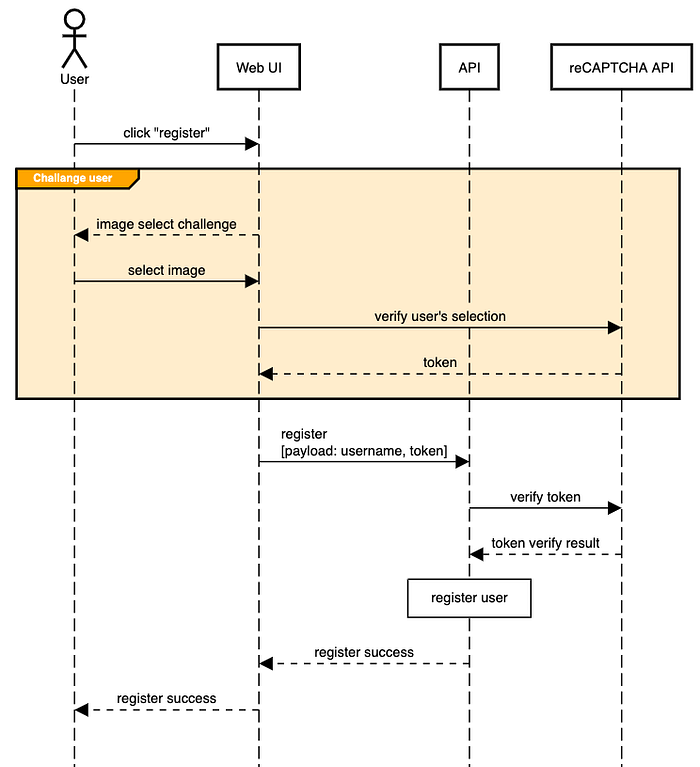
…and this is when there is an image selection challenge (diagream source):
Example code
While the backend code is basically identical to the previous checkbox example, the frontend is a bit different: we run reCAPTCHA check when user clicking “register” instead of clicking the checkbox.
reCAPTCHA v3
This option is quite different from the previous two — it does not use “image selection” popup to test if user is a bot or not.
Probably we could even say that there is no CAPTCHA at all: reCAPTCHA v3 claims that it has the ability to observe users’ interactions with the site, and calculates a score for the user action, then our backend can use a custom threshold to decide whether the action should be allowed or blocked.
It would be easier to understand with a diagram (source):
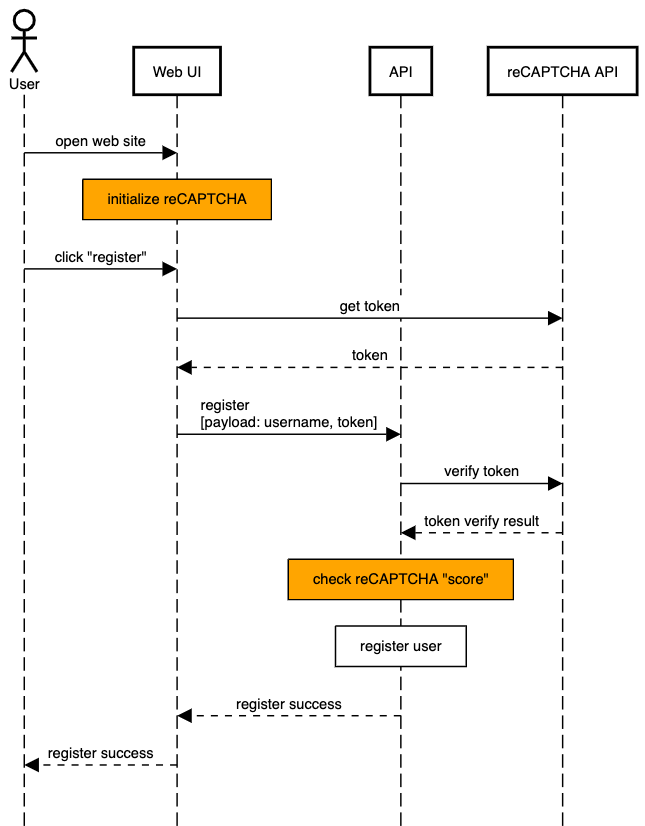
It is very important to understand that when using reCAPTCHA v3, there is no such a chance for a human user to prove he/she is not a bot. When API receives the reCAPTCHA token verification result, we can either allow user to proceed or give user a hard stop with error based on the “score”.
Also, it is worth noting that the check on “score” can be different for different user actions. For example, we can have different threshold for “register” and “login”.
Code example
Note: we are using a library called “react-google-recaptcha-v3” to make it is easier to integrate reCAPTCHA within a React app.
First of all, we need to initialise reCAPTCHA as early as possible:
root.render(
  <React.StrictMode>
    <GoogleReCaptchaProvider reCaptchaKey={SITE_KEY}>
      <App />
    </GoogleReCaptchaProvider>
  </React.StrictMode>
);
Then we need to get token and send the request when user click “register”:
const App = () => {
  const { executeRecaptcha } = useGoogleReCaptcha();

  const handleClickRegister = React.useCallback(async () => {
    if (!executeRecaptcha) {
      console.log("Execute recaptcha not yet available");
      return;
    }

    const recaptchaToken = await executeRecaptcha("register");

    // TODO: send API request and get result
  }, [executeRecaptcha, username]);

  return (
    <div className="App">
      {/* ... */}
      <button type="button" onClick={handleClickRegister}>
        register
      </button>
      {/* ... */}
    </div>
  );
};
You may already noticed that when getting the token, we also tells reCAPTCHA the action which is “register”.
Finally, we need to verify the token with “action” and “score” in backend:
const verifyRecaptchaToken = async (args: VerifyRecaptchaTokenArgs) => {
  // ... Get token verify result ...

  const score = _.toNumber(_.get(response.data, "score"));
  const action = _.toString(_.get(response.data, "action"));

  if (action === "register" && score < 0.5) {
    throw new Error("Bot detected!");
  }
};
As shown in the code above, we are using 0.5 as the threshold for “register” action. That is, if the score is equal or above 0.5, we allow user to register; if score is below 0.5, we throw an error and stop user from registering.
Material
You can find complete and runnable code examples for all three options (V2 Checkbox, V2 Invisible, and V3) from the repo on my github:
Note: the keys for reCAPTCHA are included and hard-coded in the repo for convenience. I would recommend to register your own account and get your own keys if you would like to explore more about reCAPTCHA.
Further discussion
While reCAPTCHA is the most popular choice, you might have some concerns about the privacy obligation, and the concerns are completely valid. For example, you may want to check this article[3] to understand how to make your application comply to GDPR when using reCAPTCHA.
As an alternative, hCaptcha claims to be a drop-in replacement of Google reCAPTCHA, but is more friendly to various of privacy policies. So it may worth to have a look if you’re concerned about privacy policy and regulations.
References
- [1] https://en.wikipedia.org/wiki/CAPTCHA
- [2] https://developers.google.com/recaptcha/docs/versions
- [3] https://measuredcollective.com/gdpr-recaptcha-how-to-stay-compliant-with-gdpr/
More content at PlainEnglish.io.
Sign up for our free weekly newsletter. Follow us on Twitter, LinkedIn, YouTube, and Discord.
Looking to scale your tech startup with content? Check out Circuit.
We offer free expert advice and bespoke solutions to help you build awareness and adoption for your tech product or service.